Data Management Overview
In any data-driven project, effective management of data is crucial. This section provides essential techniques for handling and preparing data to ensure consistency, accuracy, and ease of analysis. From directory setup and data cleaning to advanced data processing, these methods form the backbone of reliable data management. Dive into the following topics to enhance your data handling capabilities and streamline your workflow.
Data Management Techniques
Path directories
Ensure that the directory exists. If not, create it.
- ensure_directory(path)
- Parameters:
path (str) – The path to the directory that needs to be ensured.
- Returns:
None
The ensure_directory function is a utility designed to facilitate the
management of directory paths within your project. When working with data
science projects, it is common to save and load data, images, and other
artifacts from specific directories. This function helps in making sure that
these directories exist before any read/write operations are performed. If
the specified directory does not exist, the function creates it. If it
already exists, it does nothing, thus preventing any errors related to
missing directories.
Implementation Example
In the example below, we demonstrate how to use the ensure_directory function
to verify and create directories as needed. This example sets up paths for data and
image directories, ensuring they exist before performing any operations that depend on them.
First, we define the base path as the parent directory of the current directory.
The os.pardir constant, equivalent to ".."", is used to navigate up one
directory level. Then, we define paths for the data directory and data output
directory, both located one level up from the current directory.
Next, we set paths for the PNG and SVG image directories, located within an
images folder in the parent directory. Using the ensure_directory
function, we then verify that these directories exist. If any of the specified
directories do not exist, the function creates them.
from eda_toolkit import ensure_directory
import os # import operating system for dir


base_path = os.path.join(os.pardir)

# Go up one level from 'notebooks' to parent directory,
# then into the 'data' folder
data_path = os.path.join(os.pardir, "data")
data_output = os.path.join(os.pardir, "data_output")

# create image paths
image_path_png = os.path.join(base_path, "images", "png_images")
image_path_svg = os.path.join(base_path, "images", "svg_images")

# Use the function to ensure'data' directory exists
ensure_directory(data_path)
ensure_directory(data_output)
ensure_directory(image_path_png)
ensure_directory(image_path_svg)
Output
Created directory: ../data
Created directory: ../data_output
Created directory: ../images/png_images
Created directory: ../images/svg_images
Adding Unique Identifiers
Add a column of unique IDs with a specified number of digits to the DataFrame.
- add_ids(df, id_colname='ID', num_digits=9, seed=None, set_as_index=False)
- Parameters:
df (pd.DataFrame) – The DataFrame to which IDs will be added.
id_colname (str, optional) – The name of the new column for the unique IDs. Defaults to
"ID".num_digits (int, optional) – The number of digits for the unique IDs. Defaults to
9. The first digit will always be non-zero to ensure proper formatting.seed (int, optional) – The seed for the random number generator to ensure reproducibility. Defaults to
None.set_as_index (bool, optional) – If
True, the generated ID column will replace the existing index of the DataFrame. Defaults toFalse.
- Returns:
The updated DataFrame with a new column of unique IDs. If
set_as_indexisTrue, the new ID column replaces the existing index.- Return type:
pd.DataFrame
- Raises:
ValueError – If the number of rows in the DataFrame exceeds the pool of possible unique IDs for the specified
num_digits.
Notes
The function ensures all IDs are unique by resolving potential collisions during generation, even for large datasets.
The total pool size of unique IDs is determined by \(9 \times 10^{(\text{num_digits} - 1)}\), since the first digit must be non-zero.
Warnings are printed if the number of rows in the DataFrame approaches the pool size of possible unique IDs, recommending increasing
num_digits.If
set_as_indexisFalse, the ID column will be added as the first column in the DataFrame.Setting a random seed ensures reproducibility of the generated IDs.
The add_ids function is used to append a column of unique identifiers with a
specified number of digits to a given dataframe. This is particularly useful for
creating unique patient or record IDs in datasets. The function allows you to
specify a custom column name for the IDs, the number of digits for each ID, and
optionally set a seed for the random number generator to ensure reproducibility.
Additionally, you can choose whether to set the new ID column as the index of the
dataframe.
Implementation Example
In the example below, we demonstrate how to use the add_ids function to add a
column of unique IDs to a dataframe. We start by importing the necessary libraries
and creating a sample dataframe. We then use the add_ids function to generate
and append a column of unique IDs with a specified number of digits to the dataframe.
First, we import the pandas library and the add_ids function from the eda_toolkit.
Then, we create a sample dataframe with some data. We call the add_ids function,
specifying the dataframe, the column name for the IDs, the number of digits for
each ID, a seed for reproducibility, and whether to set the new ID column as the
index. The function generates unique IDs for each row and adds them as the first
column in the dataframe.
from eda_toolkit import add_ids

# Add a column of unique IDs with 9 digits and call it "census_id"
df = add_ids(
    df=df,
    id_colname="census_id",
    num_digits=9,
    seed=111,
    set_as_index=True,
)
Output
First 5 Rows of Census Income Data (Adapted from Kohavi, 1996, UCI Machine Learning Repository) [1]
DataFrame index is unique.
| age | workclass | fnlwgt | education | education-num | marital-status | occupation | relationship | |
|---|---|---|---|---|---|---|---|---|
| census_id | ||||||||
| 582248222 | 39 | State-gov | 77516 | Bachelors | 13 | Never-married | Adm-clerical | Not-in-family |
| 561810758 | 50 | Self-emp-not-inc | 83311 | Bachelors | 13 | Married-civ-spouse | Exec-managerial | Husband |
| 598098459 | 38 | Private | 215646 | HS-grad | 9 | Divorced | Handlers-cleaners | Not-in-family |
| 776705221 | 53 | Private | 234721 | 11th | 7 | Married-civ-spouse | Handlers-cleaners | Husband |
| 479262902 | 28 | Private | 338409 | Bachelors | 13 | Married-civ-spouse | Prof-specialty | Wife |
Trailing Period Removal
Strip the trailing period from values in a specified column of a DataFrame, if present.
- strip_trailing_period(df, column_name)
- Parameters:
df (pd.DataFrame) – The DataFrame containing the column to be processed.
column_name (str) – The name of the column containing values with potential trailing periods.
- Returns:
The updated DataFrame with trailing periods removed from the specified column.
- Return type:
pd.DataFrame
- Raises:
ValueError – If the specified
column_namedoes not exist in the DataFrame, pandas will raise aValueError.
Notes:
For string values, trailing periods are stripped directly.
For numeric values represented as strings (e.g.,
"1234."), the trailing period is removed, and the value is converted back to a numeric type if possible.NaNvalues are preserved and remain unprocessed.Non-string and non-numeric types are returned as-is.
The strip_trailing_period function is designed to remove trailing periods
from float values in a specified column of a DataFrame. This can be particularly
useful when dealing with data that has been inconsistently formatted, ensuring
that all float values are correctly represented.
Implementation Example
In the example below, we demonstrate how to use the strip_trailing_period function to clean a
column in a DataFrame. We start by importing the necessary libraries and creating a sample DataFrame.
We then use the strip_trailing_period function to remove any trailing periods from the specified column.
from eda_toolkit import strip_trailing_period

# Create a sample dataframe with trailing periods in some values
data = {
    "values": [1.0, 2.0, 3.0, 4.0, 5.0, 6.],
}
df = pd.DataFrame(data)

# Remove trailing periods from the 'values' column
df = strip_trailing_period(df=df, column_name="values")
Output
First 6 Rows of Data Before and After Removing Trailing Periods (Adapted from Example)
Before:
|
After:
|
Note
The last row shows 6 as an int with a trailing period with its conversion to float.
Standardized Dates
Parse and standardize date strings based on the provided rule.
- parse_date_with_rule(date_str)
This function takes a date string and standardizes it to the
ISO 8601format (YYYY-MM-DD). It assumes dates are provided in either day/month/year or month/day/year format. The function first checks if the first part of the date string (day or month) is greater than 12, which unambiguously indicates a day/month/year format. If the first part is 12 or less, the function attempts to parse the date as month/day/year, falling back to day/month/year if the former raises aValueErrordue to an impossible date (e.g., month being greater than 12).- Parameters:
date_str (str) – A date string to be standardized.
- Returns:
A standardized date string in the format
YYYY-MM-DD.- Return type:
- Raises:
ValueError – If
date_stris in an unrecognized format or if the function cannot parse the date.
Implementation Example
In the example below, we demonstrate how to use the parse_date_with_rule
function to standardize date strings. We start by importing the necessary library
and creating a sample list of date strings. We then use the parse_date_with_rule
function to parse and standardize each date string to the ISO 8601 format.
from eda_toolkit import parse_date_with_rule

date_strings = ["15/04/2021", "04/15/2021", "01/12/2020", "12/01/2020"]

standardized_dates = [parse_date_with_rule(date) for date in date_strings]

print(standardized_dates)
Output
['2021-04-15', '2021-04-15', '2020-12-01', '2020-01-12']
Important
In the next example, we demonstrate how to apply the parse_date_with_rule
function to a DataFrame column containing date strings using the .apply() method.
This is particularly useful when you need to standardize date formats across an
entire column in a DataFrame.
# Creating the DataFrame
data = {
    "date_column": [
        "31/12/2021",
        "01/01/2022",
        "12/31/2021",
        "13/02/2022",
        "07/04/2022",
    ],
    "name": ["Alice", "Bob", "Charlie", "David", "Eve"],
    "amount": [100.0, 150.5, 200.75, 250.25, 300.0],
}

df = pd.DataFrame(data)

# Apply the function to the DataFrame column
df["standardized_date"] = df["date_column"].apply(parse_date_with_rule)

print(df)
Output
   date_column     name  amount standardized_date
0   31/12/2021    Alice  100.00        2021-12-31
1   01/01/2022      Bob  150.50        2022-01-01
2   12/31/2021  Charlie  200.75        2021-12-31
3   13/02/2022    David  250.25        2022-02-13
4   07/04/2022      Eve  300.00        2022-04-07
DataFrame Analysis
Analyze DataFrame columns, including data type, null values, and unique value counts.
The dataframe_profiler function provides a comprehensive summary of a DataFrame’s columns, including information on data types, null values, unique values, and the most frequent values. It can output either a plain DataFrame for further processing or a styled DataFrame for visual presentation in Jupyter environments.
- dataframe_profiler(df, background_color=None, return_df=False, sort_cols_alpha=False)
- Parameters:
df (pandas.DataFrame) – The DataFrame to analyze.
background_color (str, optional) – Hex color code or color name for background styling in the output DataFrame. Applies to specific columns, such as unique value totals and percentages. Defaults to
None.return_df (bool, optional) – If
True, returns the plain DataFrame with summary statistics. IfFalse, returns a styled DataFrame for visual presentation. Defaults toFalse.sort_cols_alpha (bool, optional) – If
True, sorts the DataFrame columns alphabetically in the output. Defaults toFalse.
- Returns:
If
return_dfisTrueor running in a terminal environment, returns the plain DataFrame containing column summary statistics.If
return_dfisFalseand running in a Jupyter Notebook, returns a styled DataFrame with optional background styling.
- Return type:
pandas.DataFrame
- Raises:
ValueError – If the DataFrame is empty or contains no columns.
Notes
Automatically detects whether the function is running in a Jupyter Notebook or terminal and adjusts the output accordingly.
In Jupyter environments, uses Pandas’ Styler for visual presentation. If the installed Pandas version does not support
hide, falls back tohide_index.Utilizes a
tqdmprogress bar to show the status of column processing.Preprocesses columns to handle NaN values and replaces empty strings with Pandas’
pd.NAfor consistency.
Census Income Example
In the example below, we demonstrate how to use the dataframe_profiler
function to analyze a DataFrame’s columns.
from eda_toolkit import dataframe_profiler

dataframe_profiler(df=df)
Output
Result on Census Income Data (Adapted from Kohavi, 1996, UCI Machine Learning Repository) [1]
Shape:  (48842, 15)

Processing columns: 100%|██████████| 15/15 [00:00<00:00, 74.38it/s]

Total seconds of processing time: 0.351102
| column | dtype | null_total | null_pct | unique_values_total | max_unique_value | max_unique_value_total | max_unique_value_pct | |
|---|---|---|---|---|---|---|---|---|
| 0 | age | int64 | 0 | 0.00 | 74 | 36 | 1348 | 2.76 |
| 1 | workclass | object | 963 | 1.97 | 9 | Private | 33906 | 69.42 |
| 2 | fnlwgt | int64 | 0 | 0.00 | 28523 | 203488 | 21 | 0.04 |
| 3 | education | object | 0 | 0.00 | 16 | HS-grad | 15784 | 32.32 |
| 4 | education-num | int64 | 0 | 0.00 | 16 | 9 | 15784 | 32.32 |
| 5 | marital-status | object | 0 | 0.00 | 7 | Married-civ-spouse | 22379 | 45.82 |
| 6 | occupation | object | 966 | 1.98 | 15 | Prof-specialty | 6172 | 12.64 |
| 7 | relationship | object | 0 | 0.00 | 6 | Husband | 19716 | 40.37 |
| 8 | race | object | 0 | 0.00 | 5 | White | 41762 | 85.50 |
| 9 | sex | object | 0 | 0.00 | 2 | Male | 32650 | 66.85 |
| 10 | capital-gain | int64 | 0 | 0.00 | 123 | 0 | 44807 | 91.74 |
| 11 | capital-loss | int64 | 0 | 0.00 | 99 | 0 | 46560 | 95.33 |
| 12 | hours-per-week | int64 | 0 | 0.00 | 96 | 40 | 22803 | 46.69 |
| 13 | native-country | object | 274 | 0.56 | 42 | United-States | 43832 | 89.74 |
| 14 | income | object | 0 | 0.00 | 4 | <=50K | 24720 | 50.61 |
DataFrame Column Names
unique_values_totalThis column indicates the total number of unique values present in each column of the DataFrame. It measures the distinct values that a column holds. For example, in the
agecolumn, there are 74 unique values, meaning the ages vary across 74 distinct entries.max_unique_valueThis column shows the most frequently occurring value in each column. For example, in the
workclasscolumn, the most common value isPrivate, indicating that this employment type is the most represented in the dataset. For numeric columns likecapital-gainandcapital-loss, the most common value is0, which suggests that the majority of individuals have no capital gain or loss.max_unique_value_totalThis represents the count of the most frequently occurring value in each column. For instance, in the
native-countrycolumn, the valueUnited-Statesappears43,832times, indicating that the majority of individuals in the dataset are from the United States.max_unique_value_pctThis column shows the percentage that the most frequent value constitutes of the total number of rows. For example, in the
racecolumn, the valueWhitemakes up85.5%of the data, suggesting a significant majority of the dataset belongs to this racial group.
Calculation Details
unique_values_totalis calculated using thenunique()function, which counts the number of unique values in a column.max_unique_valueis determined by finding the value with the highest frequency usingvalue_counts(). For string columns, any missing values (if present) are replaced with the string"null"before computing the frequency.max_unique_value_totalis the frequency count of themax_unique_value.max_unique_value_pctis the percentage ofmax_unique_value_totaldivided by the total number of rows in the DataFrame, providing an idea of how dominant the most frequent value is.
This analysis helps in identifying columns with a high proportion of dominant values, like <=50K in the income column, which appears 24,720 times, making up 50.61% of the entries. This insight can be useful for understanding data distributions, identifying potential data imbalances, or even spotting opportunities for feature engineering in further data processing steps.
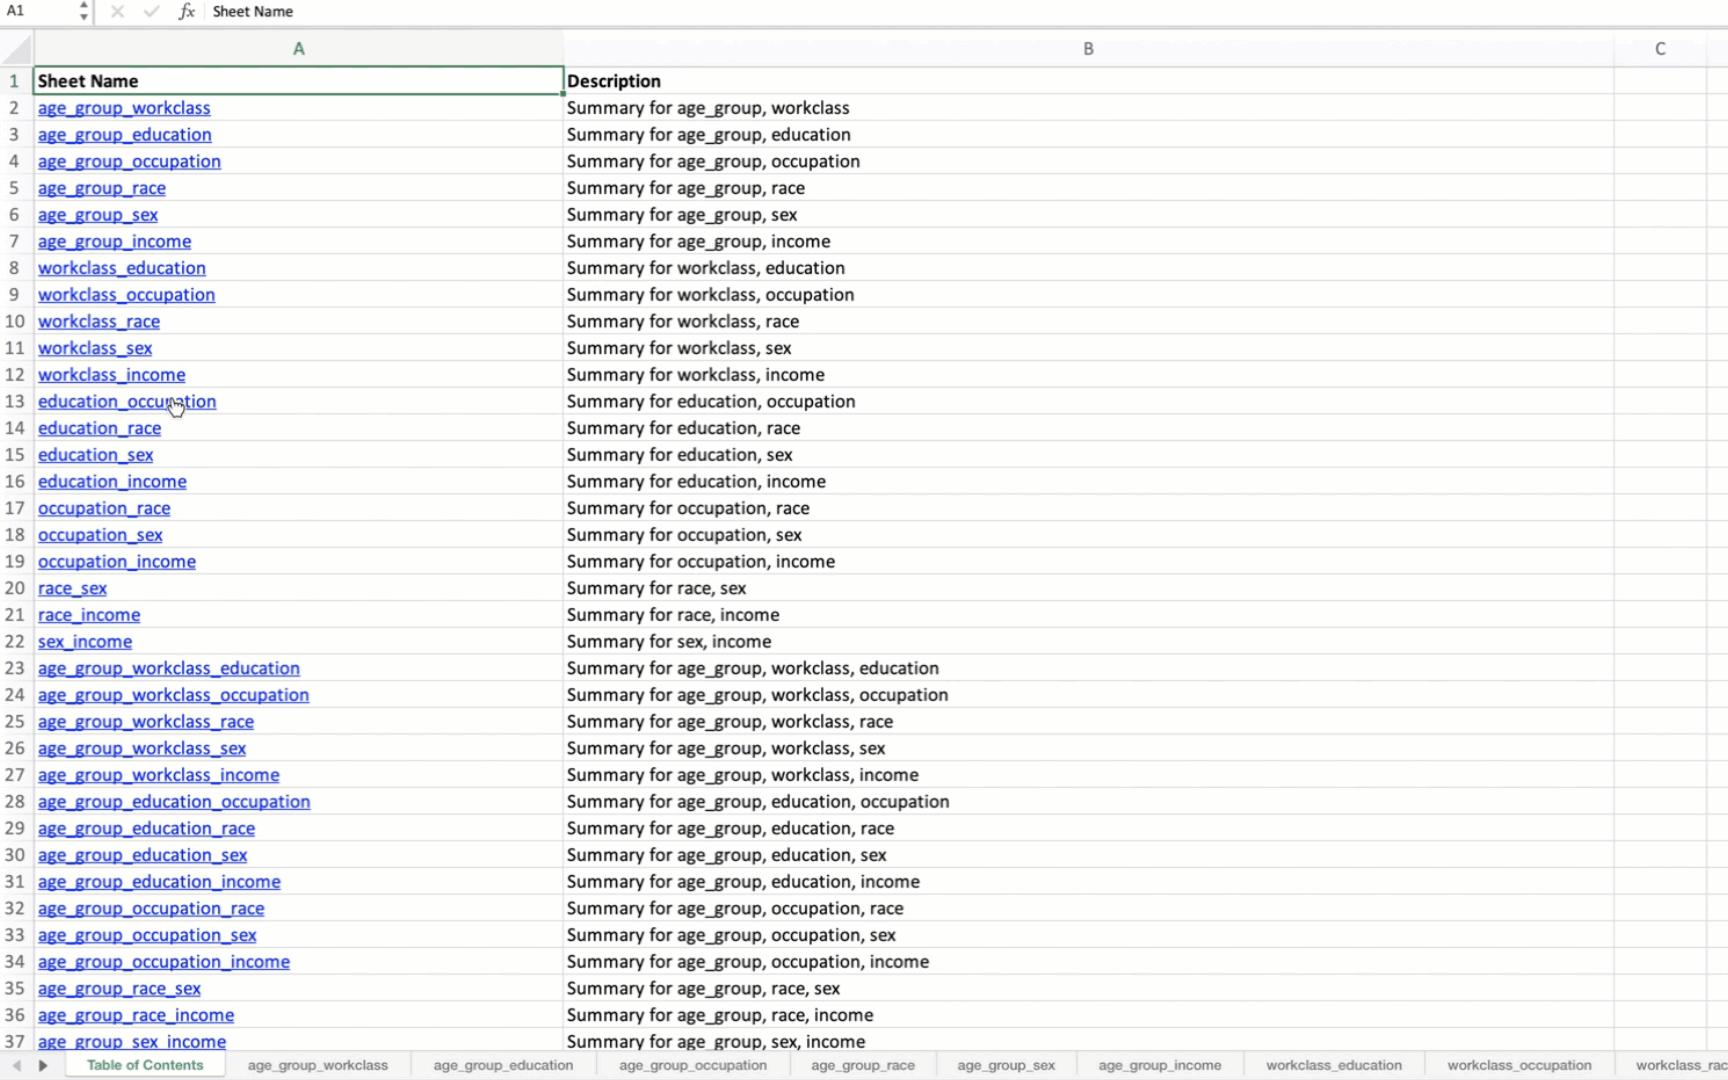
Generating Summary Tables for Variable Combinations
Generate and save summary tables for all possible combinations of specified variables in a DataFrame to an Excel file, complete with formatting and progress tracking.
- summarize_all_combinations(df, variables, data_path, data_name, min_length=2)
Generate summary tables for all possible combinations of the specified variables in the DataFrame and save them to an Excel file with a Table of Contents.
- Parameters:
df (pandas.DataFrame) – The pandas DataFrame containing the data.
variables (list of str) – List of column names from the DataFrame to generate combinations.
data_path (str) – Directory path where the output Excel file will be saved.
data_name (str) – Name of the output Excel file.
min_length (int, optional) – Minimum size of the combinations to generate. Defaults to
2.
- Returns:
A tuple containing: - A dictionary where keys are tuples of column names (combinations) and values are the corresponding summary DataFrames. - A list of all generated combinations, where each combination is represented as a tuple of column names.
- Return type:
Notes
- Excel Output:
Each combination is saved as a separate sheet in an Excel file.
A “Table of Contents” sheet is created with hyperlinks to each combination’s summary table.
Sheet names are truncated to 31 characters to meet Excel’s constraints.
- Formatting:
Headers in all sheets are bold, left-aligned, and borderless.
Columns are auto-fitted to content length for improved readability.
A left-aligned format is applied to all columns in the output.
- The function uses
tqdmprogress bars for tracking: Combination generation.
Writing the Table of Contents.
Writing individual summary tables to Excel.
- The function uses
The function returns two outputs:
1.
summary_tables: A dictionary where each key is a tuple representing a combination of variables, and each value is a DataFrame containing the summary table for that combination. Each summary table includes the count and proportion of occurrences for each unique combination of values.2.
all_combinations: A list of all generated combinations of the specified variables. This is useful for understanding which combinations were analyzed and included in the summary tables.
Implementation Example
Below, we use the summarize_all_combinations function to generate summary tables for the specified
variables from a DataFrame containing the census data [1].
Note
Before proceeding with any further examples in this documentation, ensure that the age variable is binned into a new variable, age_group.
Detailed instructions for this process can be found under Binning Numerical Columns.
from eda_toolkit import summarize_all_combinations

# Define unique variables for the analysis
unique_vars = [
    "age_group",
    "workclass",
    "education",
    "occupation",
    "race",
    "sex",
    "income",
]

# Generate summary tables for all combinations of the specified variables
summary_tables, all_combinations = summarize_all_combinations(
    df=df,
    data_path=data_output,
    variables=unique_vars,
    data_name="census_summary_tables.xlsx",
)

# Print all combinations of variables
print(all_combinations)
Output
Generating combinations: 100%|██████████| 120/120 [00:01<00:00, 76.56it/s]
Writing summary tables: 100%|██████████| 120/120 [00:41<00:00,  2.87it/s]
Finalizing Excel file: 100%|██████████| 1/1 [00:00<00:00, 13706.88it/s]
Data saved to ../data_output/census_summary_tables.xlsx
[('age_group', 'workclass'),
('age_group', 'education'),
('age_group', 'occupation'),
('age_group', 'race'),
('age_group', 'sex'),
('age_group', 'income'),
('workclass', 'education'),
('workclass', 'occupation'),
('workclass', 'race'),
('workclass', 'sex'),
('workclass', 'income'),
('education', 'occupation'),
('education', 'race'),
('education', 'sex'),
('education', 'income'),
('occupation', 'race'),
('occupation', 'sex'),
('occupation', 'income'),
('race', 'sex'),
('race', 'income'),
('sex', 'income'),
('age_group', 'workclass', 'education'),
('age_group', 'workclass', 'occupation'),
('age_group', 'workclass', 'race'),
('age_group', 'workclass', 'sex'),
('age_group', 'workclass', 'income'),
('age_group', 'education', 'occupation'),
('age_group', 'education', 'race'),
('age_group', 'education', 'sex'),
('age_group', 'education', 'income'),
('age_group', 'occupation', 'race'),
('age_group', 'occupation', 'sex'),
('age_group', 'occupation', 'income'),
('age_group', 'race', 'sex'),
('age_group', 'race', 'income'),
('age_group', 'sex', 'income'),
('workclass', 'education', 'occupation'),
('workclass', 'education', 'race'),
('workclass', 'education', 'sex'),
('workclass', 'education', 'income'),
('workclass', 'occupation', 'race'),
('workclass', 'occupation', 'sex'),
('workclass', 'occupation', 'income'),
('workclass', 'race', 'sex'),
('workclass', 'race', 'income'),
('workclass', 'sex', 'income'),
('education', 'occupation', 'race'),
('education', 'occupation', 'sex'),
('education', 'occupation', 'income'),
('education', 'race', 'sex'),
('education', 'race', 'income'),
('education', 'sex', 'income'),
('occupation', 'race', 'sex'),
('occupation', 'race', 'income'),
('occupation', 'sex', 'income'),
('race', 'sex', 'income'),
('age_group', 'workclass', 'education', 'occupation'),
('age_group', 'workclass', 'education', 'race'),
('age_group', 'workclass', 'education', 'sex'),
('age_group', 'workclass', 'education', 'income'),
('age_group', 'workclass', 'occupation', 'race'),
('age_group', 'workclass', 'occupation', 'sex'),
('age_group', 'workclass', 'occupation', 'income'),
('age_group', 'workclass', 'race', 'sex'),
('age_group', 'workclass', 'race', 'income'),
('age_group', 'workclass', 'sex', 'income'),
('age_group', 'education', 'occupation', 'race'),
('age_group', 'education', 'occupation', 'sex'),
('age_group', 'education', 'occupation', 'income'),
('age_group', 'education', 'race', 'sex'),
('age_group', 'education', 'race', 'income'),
('age_group', 'education', 'sex', 'income'),
('age_group', 'occupation', 'race', 'sex'),
('age_group', 'occupation', 'race', 'income'),
('age_group', 'occupation', 'sex', 'income'),
('age_group', 'race', 'sex', 'income'),
('workclass', 'education', 'occupation', 'race'),
('workclass', 'education', 'occupation', 'sex'),
('workclass', 'education', 'occupation', 'income'),
('workclass', 'education', 'race', 'sex'),
('workclass', 'education', 'race', 'income'),
('workclass', 'education', 'sex', 'income'),
('workclass', 'occupation', 'race', 'sex'),
('workclass', 'occupation', 'race', 'income'),
('workclass', 'occupation', 'sex', 'income'),
('workclass', 'race', 'sex', 'income'),
('education', 'occupation', 'race', 'sex'),
('education', 'occupation', 'race', 'income'),
('education', 'occupation', 'sex', 'income'),
('education', 'race', 'sex', 'income'),
('occupation', 'race', 'sex', 'income'),
('age_group', 'workclass', 'education', 'occupation', 'race'),
('age_group', 'workclass', 'education', 'occupation', 'sex'),
('age_group', 'workclass', 'education', 'occupation', 'income'),
('age_group', 'workclass', 'education', 'race', 'sex'),
('age_group', 'workclass', 'education', 'race', 'income'),
('age_group', 'workclass', 'education', 'sex', 'income'),
('age_group', 'workclass', 'occupation', 'race', 'sex'),
('age_group', 'workclass', 'occupation', 'race', 'income'),
('age_group', 'workclass', 'occupation', 'sex', 'income'),
('age_group', 'workclass', 'race', 'sex', 'income'),
('age_group', 'education', 'occupation', 'race', 'sex'),
('age_group', 'education', 'occupation', 'race', 'income'),
('age_group', 'education', 'occupation', 'sex', 'income'),
('age_group', 'education', 'race', 'sex', 'income'),
('age_group', 'occupation', 'race', 'sex', 'income'),
('workclass', 'education', 'occupation', 'race', 'sex'),
('workclass', 'education', 'occupation', 'race', 'income'),
('workclass', 'education', 'occupation', 'sex', 'income'),
('workclass', 'education', 'race', 'sex', 'income'),
('workclass', 'occupation', 'race', 'sex', 'income'),
('education', 'occupation', 'race', 'sex', 'income'),
('age_group', 'workclass', 'education', 'occupation', 'race', 'sex'),
('age_group', 'workclass', 'education', 'occupation', 'race', 'income'),
('age_group', 'workclass', 'education', 'occupation', 'sex', 'income'),
('age_group', 'workclass', 'education', 'race', 'sex', 'income'),
('age_group', 'workclass', 'occupation', 'race', 'sex', 'income'),
('age_group', 'education', 'occupation', 'race', 'sex', 'income'),
('workclass', 'education', 'occupation', 'race', 'sex', 'income'),
('age_group',
'workclass',
'education',
'occupation',
'race',
'sex',
'income')]
When applied to the US Census data, the output Excel file will contain summary tables for all possible combinations of the specified variables. The first sheet will be a Table of Contents with hyperlinks to each summary table.
Saving DataFrames to Excel with Customized Formatting
Save multiple DataFrames to separate sheets in an Excel file with progress tracking and formatting.
This section explains how to save multiple DataFrames to separate sheets in an
Excel file with customized formatting using the save_dataframes_to_excel function.
- save_dataframes_to_excel(file_path, df_dict, decimal_places=0)
Save DataFrames to an Excel file, applying formatting and autofitting columns.
Notes
Progress Tracking: The function uses
tqdmto display a progress bar while saving DataFrames to Excel sheets.- Column Formatting:
Columns are autofitted to content length and left-aligned by default.
Numeric columns are rounded to the specified decimal places and formatted accordingly.
Non-numeric columns are left-aligned.
- Header Styling:
Headers are bold, left-aligned, and borderless.
Dependencies: This function requires the
xlsxwriterlibrary.
The function performs the following tasks:
Writes each DataFrame to its respective sheet in the Excel file.
Rounds numeric columns to the specified number of decimal places.
Applies customized formatting to headers and cells.
Autofits columns based on content length for improved readability.
Tracks the saving process with a progress bar, making it user-friendly for large datasets.
Implementation Example
Below, we use the save_dataframes_to_excel function to save two DataFrames:
the original DataFrame and a filtered DataFrame with ages between 18 and 40.
from eda_toolkit import save_dataframes_to_excel

file_name = "df_census.xlsx"  # Name of the output Excel file
file_path = os.path.join(data_path, file_name)

# filter DataFrame to Ages 18-40
filtered_df = df[(df["age"] > 18) & (df["age"] < 40)]

df_dict = {
    "original_df": df,
    "ages_18_to_40": filtered_df,
}

save_dataframes_to_excel(
    file_path=file_path,
    df_dict=df_dict,
    decimal_places=0,
)
Output
Saving DataFrames: 100%|██████████| 2/2 [00:08<00:00,  4.34s/it]
DataFrames saved to ../data/df_census.xlsx
The output Excel file will contain the original DataFrame and a filtered DataFrame as a separate tab with ages between 18 and 40, each on separate sheets with customized formatting.
Creating Contingency Tables
Create a contingency table from one or more columns in a DataFrame, with sorting options.
This section explains how to create contingency tables from one or more columns in a DataFrame, with options to sort the results using the contingency_table function.
- contingency_table(df, cols=None, sort_by=0)
- Parameters:
df (pandas.DataFrame) – The DataFrame to analyze.
cols (str or list of str, optional) – Name of the column (as a string) for a single column or list of column names for multiple columns. Must provide at least one column.
sort_by (int, optional) – Enter
0to sort results by column groups; enter1to sort results by totals in descending order. Defaults to0.
- Raises:
ValueError – If no columns are specified or if
sort_byis not0or1.- Returns:
A DataFrame containing the contingency table with the specified columns, a
'Total'column representing the count of occurrences, and a'Percentage'column representing the percentage of the total count.- Return type:
pandas.DataFrame
Implementation Example
Below, we use the contingency_table function to create a contingency table
from the specified columns in a DataFrame containing census data [1]
from eda_toolkit import contingency_table

contingency_table(
    df=df,
    cols=[
        "age_group",
        "workclass",
        "race",
        "sex",
    ],
    sort_by=1,
)
Note
You may notice a new variable, age_group, is introduced. The logic for
generating this variable is provided here.
Output
The output will be a contingency table with the specified columns, showing the
total counts and percentages of occurrences for each combination of values. The
table will be sorted by the 'Total' column in descending order because sort_by
is set to 1.
    age_group     workclass                race     sex  Total  Percentage
0       30-39       Private               White    Male   5856       11.99
1       18-29       Private               White    Male   5623       11.51
2       40-49       Private               White    Male   4267        8.74
3       18-29       Private               White  Female   3680        7.53
4       50-59       Private               White    Male   2565        5.25
..        ...           ...                 ...     ...    ...         ...
467     50-59   Federal-gov               Other    Male      1        0.00
468     50-59     Local-gov  Asian-Pac-Islander  Female      1        0.00
469     70-79  Self-emp-inc               Black    Male      1        0.00
470     80-89     Local-gov  Asian-Pac-Islander    Male      1        0.00
471                                                      48842      100.00

[472 rows x 6 columns]
Generating Summaries (Table 1)
Create a summary statistics table for both categorical and continuous variables
in a DataFrame. This section describes how to generate a summary “Table 1” from
a given dataset using the generate_table1 function. It supports automatic detection
of variable types, pretty-printing, optional export to Markdown, and p-value adjustments.
- generate_table1(df, apply_bonferroni=False, apply_bh_fdr=False, categorical_cols=None, continuous_cols=None, decimal_places=2, export_markdown=False, drop_columns=None, drop_variables=None, markdown_path=None, max_categories=None, detect_binary_numeric=True, return_markdown_only=False, value_counts=False, include_types='both', combine=True, groupby_col=None, use_fisher_exact=False, use_welch=True)
- Parameters:
df (pandas.DataFrame) – Input DataFrame containing the data to summarize.
apply_bonferroni (bool, optional) – Whether to apply Bonferroni correction to p-values.
apply_bh_fdr (bool, optional) – Whether to apply Benjamini-Hochberg FDR correction to p-values.
categorical_cols (list of str, optional) – List of categorical column names. If None, inferred automatically.
continuous_cols (list of str, optional) – List of continuous column names. If None, inferred automatically.
decimal_places (int, optional) – Number of decimal places for rounding statistics.
export_markdown (bool, optional) – Whether to export the table(s) to Markdown files.
drop_columns (str or list of str, optional) – Column name or list of column names to drop from the final output.
drop_variables (str or list of str, optional) – Variable name or list of variables to exclude from output.
markdown_path (str or Path, optional) – Output path or filename prefix for Markdown export.
max_categories (int, optional) – Maximum number of category levels to display in value counts.
detect_binary_numeric (bool, optional) – Whether to reclassify numeric variables with ≤2 unique values as categorical.
return_markdown_only (bool, optional) – If
True, returns Markdown string(s) instead of DataFrame(s).value_counts (bool, optional) – If
True, include value counts and proportions for categorical variables.include_types (str) – Which types of variables to include:
"categorical","continuous", or"both".combine (bool, optional) – If
True, return a single DataFrame wheninclude_typesis"both"; otherwise, return tuple.groupby_col (str, optional) – Optional column name for binary group comparisons (e.g., treatment vs. control).
use_fisher_exact (bool, optional) – Whether to use Fisher’s Exact Test for 2x2 categorical comparisons.
use_welch (bool, optional) – Whether to use Welch’s t-test (default). If
False, uses Student’s t-test.
- Returns:
If
include_types="both"andcombine=False: tuple of two DataFrames (continuous, categorical)If
include_types="both"andcombine=True: single combined DataFrameIf
include_types="continuous"or"categorical": single DataFrameIf
export_markdown=Trueandreturn_markdown_only=True: returns Markdown string or dict of strings
- Return type:
Important
By default, combine=True, so the function returns a single DataFrame containing
both continuous and categorical summaries. This may introduce visual clutter,
as categorical rows do not use columns like mean, standard deviation, median, min, or max.
These columns are automatically removed when generating a categorical-only summary.
To separate the summaries for clarity or further processing, set combine=False
and unpack the result into two distinct objects:
df_cont, df_cat = generate_table1(df, combine=False)
This provides greater flexibility for formatting, exporting, or downstream analysis.
Important
When using combine=False, the function returns a tuple of two TableWrapper objects — one for continuous variables and one for categorical variables.
The TableWrapper class is a lightweight wrapper designed to override the string representation of a DataFrame, enabling pretty-print formatting (e.g., tables) when the result is printed in a Jupyter cell. The wrapper preserves full access to the underlying DataFrame through attribute forwarding.
class TableWrapper:
    """
    Wraps a DataFrame to override its string output without affecting
    Jupyter display.
    """
    def __init__(self, df, string):
        self._df = df
        self._string = string

    def __str__(self):
        return self._string

    def __getattr__(self, attr):
        return getattr(self._df, attr)

    def __getitem__(self, key):
        return self._df[key]

    def __len__(self):
        return len(self._df)

    def __iter__(self):
        return iter(self._df)
Because TableWrapper overrides __str__ but not __repr__, assigning the result of generate_table1() to a single variable like this:
table1 = generate_table1(df, combine=False)
will show a tuple of object addresses instead of nicely formatted tables:
(<eda_toolkit.data_manager.TableWrapper at 0x...>, <eda_toolkit.data_manager.TableWrapper at 0x...>)
To avoid this, you have two preferred options:
Assign the output to two separate variables:
table1_cont, table1_cat = generate_table1(df, combine=False)
Then display them individually:
table1_cont
table1_cat
Don’t assign the result at all when calling from a notebook or REPL cell — this will trigger automatic pretty-printing of both tables, with a blank line in between:
generate_table1(df, combine=False)
This design keeps the output clean for interactive use while still supporting unpacking in scripts and pipelines.
Example 1: Mixed Summary Table (value_counts=False)
In the example below, we generate a summary table from a dataset containing both
categorical and continuous variables. We explicitly define which columns fall into
each category—although the generate_table1 function also supports automatic
detection of variable types if desired.
The summary output is automatically pretty-printed in the console using the
table1_to_str utility. This formatting is applied behind the scenes whenever
a summary table is printed, making it especially helpful for reading outputs
within notebooks or logging environments.
In this case, we specify export_markdown=True and provide a filename via
markdown_path. This allows the summary to be exported in Markdown format
for use in reports, documentation, or publishing platforms like Jupyter Book or Quarto.
When include_types="both" and combine=True (the default), both continuous and
categorical summaries are merged into a single DataFrame and written to two separate
Markdown files with _continuous.md and _categorical.md suffixes.
We also set value_counts=False to limit each categorical variable to a single
summary row, rather than expanding into one row per category-level value.
from eda_toolkit import generate_table1

table1 = generate_table1(
    df=df,
    categorical_cols=["sex", "race", "workclass"],
    continuous_cols=["hours-per-week", "age", "education-num"],
    value_counts=False,
    max_categories=3,
    export_markdown=True,
    decimal_places=0,
    markdown_path="table1_summary.md",
)

print(table1)
Output
 Variable       | Type        | Mean | SD | Median | Min | Max | Mode    | Missing (n) | Missing (%) | Count  | Proportion (%)
----------------|-------------|------|----|--------|-----|-----|---------|-------------|-------------|--------|----------------
 hours-per-week | Continuous  | 40   | 12 | 40     | 1   | 99  | 40      | 0           | 0           | 48,842 | 100
 age            | Continuous  | 39   | 14 | 37     | 17  | 90  | 36      | 0           | 0           | 48,842 | 100
 education-num  | Continuous  | 10   | 3  | 10     | 1   | 16  | 9       | 0           | 0           | 48,842 | 100
 sex            | Categorical |      |    |        |     |     | Male    | 0           | 0           | 48,842 | 100
 race           | Categorical |      |    |        |     |     | White   | 0           | 0           | 48,842 | 100
 workclass      | Categorical |      |    |        |     |     | Private | 963         | 2           | 47,879 | 98
Note
If categorical_cols or continuous_cols are not specified, generate_table1
will automatically detect them based on the column data types. Additionally, numeric
columns with two or fewer unique values can be reclassified as categorical using
the detect_binary_numeric=True setting (enabled by default).
When value_counts=True, one row will be generated for each category-value pair
rather than for the variable as a whole.
Example 2: Mixed Summary Table (value_counts=True)
In this example, we call generate_table1 without manually specifying which
columns are categorical or continuous. Instead, the function automatically detects
variable types based on data types. Numeric columns with two or fewer unique values
are also reclassified as categorical by default
(controlled via detect_binary_numeric=True).
We set value_counts=True to generate a separate summary row for each unique value
within a categorical variable, rather than a single row per variable. To keep
the output concise, we limit each breakdown to the top 3 most frequent values
using max_categories=3.
We also enable export_markdown=True to export the summaries in Markdown format.
While you can specify a custom markdown_path, if none is provided, the output files
are saved to the current working directory.
Since include_types="both" is the default and combine=True by default as well,
the underlying summaries are merged into a single DataFrame for display—but two
separate Markdown files are still generated with suffixes that reflect the type of
summary:
table1_summary_continuous.mdtable1_summary_categorical.md
This setup is ideal for detailed reporting, especially when working with downstream tools like Jupyter Book, Quarto, or static site generators.
from eda_toolkit import generate_table1

table1_cont, table1_cat = generate_table1(
    df=df,
    value_counts=True,
    max_categories=3,
    combine=False,
    export_markdown=True,
    markdown_path="table1_summary.md",
)

table1_cont = table1_cont.drop(columns=["Type", "Mode"])
Output
table1_cont
| Variable | Mean | SD | Median | Min | Max | Missing (n) | Missing (%) | Count | Proportion (%) |
|---|---|---|---|---|---|---|---|---|---|
| age | 38.64 | 13.71 | 37 | 17 | 90 | 0 | 0 | 48,842 | 100 |
| capital-gain | 1,079.07 | 7,452.02 | 0 | 0.00 | 99,999.00 | 0 | 0 | 48,842 | 100 |
| capital-loss | 87.5 | 403 | 0 | 0.00 | 4,356.00 | 0 | 0 | 48,842 | 100 |
| education-num | 10.08 | 2.57 | 10 | 1 | 16 | 0 | 0 | 48,842 | 100 |
| fnlwgt | 189,664.13 | 105,604.03 | 178,144.50 | 12,285.00 | 1,490,400.00 | 0 | 0 | 48,842 | 100 |
| hours-per-week | 40.42 | 12.39 | 40 | 1 | 99 | 0 | 0 | 48,842 | 100 |
table1_cat
| Variable | Type | Mode | Missing (n) | Missing (%) | Count | Proportion (%) |
|---|---|---|---|---|---|---|
| workclass = Private | Categorical | Private | 963 | 1.97 | 33,906 | 69.42 |
| workclass = Self-emp-not-inc | Categorical | Private | 963 | 1.97 | 3,862 | 7.91 |
| workclass = Local-gov | Categorical | Private | 963 | 1.97 | 3,136 | 6.42 |
| education = HS-grad | Categorical | HS-grad | 0 | 0 | 15,784 | 32.32 |
| education = Some-college | Categorical | HS-grad | 0 | 0 | 10,878 | 22.27 |
| education = Bachelors | Categorical | HS-grad | 0 | 0 | 8,025 | 16.43 |
| marital-status = Married-civ-spouse | Categorical | Married-civ-spouse | 0 | 0 | 22,379 | 45.82 |
| marital-status = Never-married | Categorical | Married-civ-spouse | 0 | 0 | 16,117 | 33 |
| marital-status = Divorced | Categorical | Married-civ-spouse | 0 | 0 | 6,633 | 13.58 |
| occupation = Prof-specialty | Categorical | Prof-specialty | 966 | 1.98 | 6,172 | 12.64 |
| occupation = Craft-repair | Categorical | Prof-specialty | 966 | 1.98 | 6,112 | 12.51 |
| occupation = Exec-managerial | Categorical | Prof-specialty | 966 | 1.98 | 6,086 | 12.46 |
| relationship = Husband | Categorical | Husband | 0 | 0 | 19,716 | 40.37 |
| relationship = Not-in-family | Categorical | Husband | 0 | 0 | 12,583 | 25.76 |
| relationship = Own-child | Categorical | Husband | 0 | 0 | 7,581 | 15.52 |
| race = White | Categorical | White | 0 | 0 | 41,762 | 85.5 |
| race = Black | Categorical | White | 0 | 0 | 4,685 | 9.59 |
| race = Asian-Pac-Islander | Categorical | White | 0 | 0 | 1,519 | 3.11 |
| sex = Male | Categorical | Male | 0 | 0 | 32,650 | 66.85 |
| sex = Female | Categorical | Male | 0 | 0 | 16,192 | 33.15 |
| native-country = United-States | Categorical | United-States | 274 | 0.56 | 43,832 | 89.74 |
| native-country = Mexico | Categorical | United-States | 274 | 0.56 | 951 | 1.95 |
| native-country = ? | Categorical | United-States | 274 | 0.56 | 583 | 1.19 |
| income = <=50K | Categorical | <=50K | 0 | 0 | 24,720 | 50.61 |
| income = <=50K. | Categorical | <=50K | 0 | 0 | 12,435 | 25.46 |
| income = >50K | Categorical | <=50K | 0 | 0 | 7,841 | 16.05 |
Example 3: Group Comparisons (P-Values)
In this example we first turn the continuous fnlwgt variable into two new categorical factors:
Equal-width bins (
fnlwgt_bin), so each interval spans the same numeric range.Quantile bins (
fnlwgt_bin_quantile), so each bin holds roughly the same number of observations.
After creating those, we build a mixed summary table that computes p-values for the two income groups (<=50K vs. >50K), alongside other categorical variables.
import pandas as pd

# Equal-width bins
df["fnlwgt_bin"] = pd.cut(
    df["fnlwgt"],
    bins=5,
    labels=[f"Bin {i}" for i in range(1, 6)],
    include_lowest=True,
)
# Select our new bins plus other categorical fields
df_table1_cat = df[["fnlwgt_bin", "age_group", "income"]]
from eda_toolkit import generate_table1

# Generate Table 1 comparing income groups
p_value_table_1_cat = generate_table1(
    df=df_table1_cat,
    value_counts=True,
    include_types="categorical",
    export_markdown=True,
    groupby_col="income",
    drop_columns=[
        "Missing (n)",
        "Missing (%)",
        "income",   # drop the raw income column itself
        "Type",     # drop internal type metadata
        "Mode",     # drop mode metadata
    ],
    drop_variables="income",
)

print(p_value_table_1_cat)
Using Chi-squared test for variable: fnlwgt_bin_width
Using Chi-squared test for variable: age_group
Using Chi-squared test for variable: sex
Using Chi-squared test for variable: marital-status
Using Chi-squared test for variable: income
Output
| Variable | Count | Proportion (%) | ≤50K (n = 37,155) | >50K (n = 11,687) | P-value |
|---|---|---|---|---|---|
| fnlwgt_bin_width | 48,842 | 100.00 | 37,155 | 11,687 | 0.66 |
| fnlwgt_bin_width = Bin 1 | 42,729 | 87.48 | 32,517 (87.52%) | 10,212 (87.38%) | |
| fnlwgt_bin_width = Bin 2 | 5,898 | 12.08 | 4,466 (12.02%) | 1,432 (12.25%) | |
| fnlwgt_bin_width = Bin 3 | 186 | 0.38 | 148 (0.40%) | 38 (0.33%) | |
| fnlwgt_bin_width = Bin 4 | 22 | 0.05 | 18 (0.05%) | 4 (0.03%) | |
| fnlwgt_bin_width = Bin 5 | 7 | 0.01 | 6 (0.02%) | 1 (0.01%) | |
| age_group | 48,842 | 100.00 | 37,155 | 11,687 | 0.00 |
| age_group = 18–29 | 13,920 | 28.50 | 13,174 (35.46%) | 746 (6.38%) | |
| age_group = 30–39 | 12,929 | 26.47 | 9,468 (25.48%) | 3,461 (29.61%) | |
| age_group = 40–49 | 10,724 | 21.96 | 6,738 (18.13%) | 3,986 (34.11%) | |
| age_group = 50–59 | 6,619 | 13.55 | 4,110 (11.06%) | 2,509 (21.47%) | |
| age_group = 60–69 | 3,054 | 6.25 | 2,245 (6.04%) | 809 (6.92%) | |
| age_group = 70–79 | 815 | 1.67 | 668 (1.80%) | 147 (1.26%) | |
| age_group = < 18 | 595 | 1.22 | 595 (1.60%) | 0 (0.00%) | |
| age_group = 80–89 | 131 | 0.27 | 115 (0.31%) | 16 (0.14%) | |
| age_group = 90–99 | 55 | 0.11 | 42 (0.11%) | 13 (0.11%) | |
| age_group = 100 + | 0 | 0.00 | 0 (0.00%) | 0 (0.00%) |
Note
groupby_col="income"enables group comparison across the two income categories.age_groupandfnlwgt_bin_widthare summarized as categorical variables with frequency counts and group-wise breakdowns.value_counts=Trueincludes one row per unique value in each categorical variable.drop_columnsanddrop_variableshelp simplify the final output for presentation by removing metadata and redundant columns.export_markdown=Truewrites the summary table to a Markdown file for convenient reporting and sharing.
This example illustrates how the same function can be used to perform basic univariate statistical testing across groups while producing a ready-to-export Markdown summary.
Highlighting Specific Columns in a DataFrame
This section explains how to highlight specific columns in a DataFrame using the highlight_columns function.
Highlight specific columns in a DataFrame with a specified background color.
- highlight_columns(df, columns, color='yellow')
- Parameters:
- Returns:
A Styler object with the specified columns highlighted.
- Return type:
pandas.io.formats.style.Styler
Implementation Example
Below, we use the highlight_columns function to highlight the age and education
columns in the first 5 rows of the census [1] DataFrame with a pink background color.
from eda_toolkit import highlight_columns

highlighted_df = highlight_columns(
    df=df.head(),
    columns=["age", "education"],
    color="#F8C5C8",
)

highlighted_df
Output
The output will be a DataFrame with the specified columns highlighted in the given background color.
The age and education columns will be highlighted in pink.
The resulting styled DataFrame can be displayed in a Jupyter Notebook or saved to an
HTML file using the .render() method of the Styler object.
| age | workclass | fnlwgt | education | education-num | marital-status | occupation | relationship | |
|---|---|---|---|---|---|---|---|---|
| census_id | ||||||||
| 582248222 | 39 | State-gov | 77516 | Bachelors | 13 | Never-married | Adm-clerical | Not-in-family |
| 561810758 | 50 | Self-emp-not-inc | 83311 | Bachelors | 13 | Married-civ-spouse | Exec-managerial | Husband |
| 598098459 | 38 | Private | 215646 | HS-grad | 9 | Divorced | Handlers-cleaners | Not-in-family |
| 776705221 | 53 | Private | 234721 | 11th | 7 | Married-civ-spouse | Handlers-cleaners | Husband |
| 479262902 | 28 | Private | 338409 | Bachelors | 13 | Married-civ-spouse | Prof-specialty | Wife |
Binning Numerical Columns
Binning numerical columns is a technique used to convert continuous numerical data into discrete categories or “bins.” This is especially useful for simplifying analysis, creating categorical features from numerical data, or visualizing the distribution of data within specific ranges. The process of binning involves dividing a continuous range of values into a series of intervals, or “bins,” and then assigning each value to one of these intervals.
Note
The code snippets below create age bins and assign a corresponding age group
label to each age in the DataFrame. The pd.cut function from pandas is used to
categorize the ages and assign them to a new column, age_group. Adjust the bins
and labels as needed for your specific data.
Below, we use the age column of the census data [1] from the UCI Machine Learning Repository as an example:
Bins Definition: The bins are defined by specifying the boundaries of each interval. For example, in the code snippet below, the
bin_ageslist specifies the boundaries for age groups:bin_ages = [ 0, 18, 30, 40, 50, 60, 70, 80, 90, 100, float("inf"), ]
Each pair of consecutive elements in
bin_agesdefines a bin. For example:The first bin is
[0, 18),The second bin is
[18, 30),and so on.
Labels for Bins: The label_ages list provides labels corresponding to each bin:
label_ages = [
    "< 18",
    "18-29",
    "30-39",
    "40-49",
    "50-59",
    "60-69",
    "70-79",
    "80-89",
    "90-99",
    "100 +",
]
These labels are used to categorize the numerical values into meaningful groups.
Applying the Binning: The pd.cut function from Pandas is used to apply the binning process. For each value in the
agecolumn of the DataFrame, it assigns a corresponding label based on which bin the value falls into. Here,right=Falseindicates that each bin includes the left endpoint but excludes the right endpoint. For example, ifbin_ages = [0, 10, 20, 30], then a value of10will fall into the bin[10, 20)and be labeled accordingly.df["age_group"] = pd.cut( df["age"], bins=bin_ages, labels=label_ages, right=False, )
Mathematically, for a given value x in the
agecolumn:\[\begin{split}\text{age_group} = \begin{cases} < 18 & \text{if } 0 \leq x < 18 \\ 18-29 & \text{if } 18 \leq x < 30 \\ \vdots \\ 100 + & \text{if } x \geq 100 \end{cases}\end{split}\]The parameter
right=Falseinpd.cutmeans that the bins are left-inclusive and right-exclusive, except for the last bin, which is always right-inclusive when the upper bound is infinity (float("inf")).
Group-by Imputer
Impute missing values using group-level statistics with optional fallback logic.
The groupby_imputer function provides a simple, transparent, and statistically
grounded approach for imputing missing values in a DataFrame using group-specific
summary statistics. Instead of applying a single global imputation value, this
function computes statistics within meaningful subgroups, preserving structure
and heterogeneity in the data.
This approach is especially useful when missingness depends on categorical attributes such as demographic groups, job categories, or experimental conditions.
Key Features
Group-aware imputation using one or more categorical variables
Supports common summary statistics: mean, median, min, max
Fallback logic for sparse or empty groups
Option to preserve the original column or overwrite in place
Fully vectorized and interpretable, no black-box modeling
- groupby_imputer(df, impute_col, by, stat='mean', fallback='global', as_new_col=True, new_col_name=None)
- Parameters:
df (pandas.DataFrame) – Input DataFrame containing missing values to impute.
impute_col (str) – Name of the column containing missing values.
by (str or list of str) – One or more categorical columns used to define groups. Group-level statistics are computed within each unique combination of these columns.
stat (str, optional) – Summary statistic used for imputation. Supported values are
"mean","median","min", and"max".fallback (str or int or float, optional) – Value used when a group contains no non-null observations for
impute_col. -"global"uses the overall statistic computed across the entire column - A numeric value (int or float) uses a fixed fallbackas_new_col (bool, optional) – If
True, a new imputed column is created and the original column is left unchanged. IfFalse, imputation is performed in place.new_col_name (str, optional) – Optional custom name for the imputed column. Ignored if
as_new_col=False.
- Returns:
A DataFrame with missing values imputed according to group-level statistics and fallback logic.
- Return type:
pandas.DataFrame
- Raises:
If
statis not one of"mean","median","min", or"max".
Notes
Group statistics are computed using non-null values only.
If a group contains only missing values, the fallback value is applied.
Using
as_new_col=Trueis recommended for exploratory workflows to preserve the original data for comparison.This method is deterministic and fully interpretable, making it suitable for regulated or audited modeling environments.
Group-wise Imputation Examples
In the example below, missing values are introduced artificially into the
"age" column of the Adult Income dataset. The goal is to impute these missing
values using group-level means, defined by combinations of "workclass"
and "education".
Two fallback strategies are demonstrated:
Global fallback, where groups with insufficient data fall back to the overall mean
Fixed-value fallback, where a constant value is used instead
from eda_toolkit import groupby_imputer
import numpy as np

# Introduce missingness for demonstration
df.loc[
    df.sample(frac=0.3, random_state=42).index, "age"
] = np.nan

# 1. Group-wise mean imputation with global fallback
X_global = groupby_imputer(
    df=df,
    impute_col="age",
    by=["workclass", "education"],
    stat="mean",
    fallback="global",
    as_new_col=True,
)

print("\n### Head with global fallback ###")
print(X_global[["age", "age_mean_imputed"]].head())

print("Means:")
print(f"Original df['age'].mean(): {df['age'].mean()}")
print(f"Imputed (global fallback) mean: {X_global['age_mean_imputed'].mean()}")
Output
### Head with global fallback ###
            age  age_mean_imputed
census_id
582248222   NaN         38.495238
561810758   NaN         45.110837
598098459  38.0         38.000000
776705221  53.0         53.000000
479262902   NaN         37.249330
Means:
Original df['age'].mean(): 38.597911608997045
Imputed (global fallback) mean: 38.621605730469135
from eda_toolkit import groupby_imputer
import numpy as np

# Introduce missingness for demonstration
df.loc[
    df.sample(frac=0.3, random_state=42).index, "age"
] = np.nan

# 2. Group-wise mean imputation with fixed fallback
X_fixed = groupby_imputer(
    df=df,
    impute_col="age",
    by=["workclass", "education"],
    stat="mean",
    fallback=50,
    as_new_col=True,
)

print("\n### Head with fixed fallback=50 ###")
print(X_fixed[["age", "age_mean_imputed"]].head())
print("Means:")
print(f"Original df['age'].mean(): {df['age'].mean()}")
print(f"Imputed (fixed fallback=50) mean: {X_fixed['age_mean_imputed'].mean()}")

print("\n### Comparison summary ###")
print(f"Missingness in original age: {df['age'].isna().mean()}")
print(f"Global fallback mean: {X_global['age_mean_imputed'].mean()}")
print(f"Fixed fallback=50 mean: {X_fixed['age_mean_imputed'].mean()}")
Output
### Head with fixed fallback=50 ###
    age  age_mean_imputed
0   NaN         38.495238
1   NaN         45.110837
2  38.0         38.000000
3  53.0         53.000000
4   NaN         37.249330

Means:
Original df['age'].mean(): 38.597911608997045
Imputed (fixed fallback=50) mean: 38.6904730183637

### Comparison summary ###
Missingness in original age: 0.30000818967282256
Global fallback mean: 38.621605730469135
Fixed fallback=50 mean: 38.6904730183637
Interpretation
Group-level imputation preserves differences across workclass and education categories that would be lost under global imputation.
The global fallback maintains consistency with the original distribution.
Fixed fallback values may be useful for domain-driven constraints but can introduce bias if not chosen carefully.
Group-aware imputation provides a strong baseline that often outperforms naive global strategies while remaining transparent and easy to audit.
Delete Inactive DataFrames
Safely clean up unused pandas DataFrames from a namespace to reduce memory usage
The del_inactive_dataframes utility is designed to help manage memory in
interactive environments such as Jupyter notebooks, scripts, and cloud runtimes.
It inspects a namespace (for example, globals() or a custom dictionary),
identifies pandas DataFrames, and optionally deletes those that are no longer
needed.
Unlike manual del calls, this function provides visibility, safety, and
auditability:
Preview what would be deleted before committing
Preserve explicitly named DataFrames
Handle Jupyter output-cache variables that can silently retain memory
Optionally track memory usage before and after cleanup
Produce readable summaries using Rich tables when available
This makes it particularly useful during exploratory analysis, large ETL pipelines, and long-running notebooks.
Key Capabilities
Selective deletion based on an explicit keep list
Dry-run mode to preview deletions without modifying state
Optional inclusion of IPython cache variables (e.g.
_14,_27)Optional garbage collection after deletion
Optional memory tracking at the DataFrame and process level
Works with
globals(),locals(), or any user-managed namespace dictionary
- del_inactive_dataframes(dfs_to_keep, del_dataframes=False, namespace=None, include_ipython_cache=False, dry_run=False, run_gc=True, track_memory=False, memory_mode='dataframes', verbose=True)
- Parameters:
dfs_to_keep (str or iterable of str) – Name or names of DataFrame variables to preserve. All other DataFrames may be deleted when
del_dataframes=True.del_dataframes (bool, optional) – Whether to actually delete inactive DataFrames. If
False, the function only reports what would be deleted.namespace (dict, optional) – Namespace dictionary to inspect and optionally modify. If
None, the function usesglobals()of the calling scope.include_ipython_cache (bool, optional) – Whether to include IPython output-cache variables (e.g.
_14) when searching for DataFrames.dry_run (bool, optional) – If
True, show planned deletions without deleting anything.run_gc (bool, optional) – Whether to call
gc.collect()after deletions occur.track_memory (bool, optional) – Whether to record memory usage before and after cleanup.
memory_mode (str, optional) – Controls which memory metrics are reported: -
"dataframes"reports total pandas DataFrame memory -"all"also reports process RSS (requirespsutil)verbose (bool, optional) – Whether to print formatted output. If
False, the function returns results silently.
- Returns:
Summary dictionary describing detected, deleted, and remaining DataFrames, along with optional memory metrics.
- Return type:
- Raises:
If
memory_modeis not one of"dataframes"or"all".
Notes
A namespace is simply a dictionary mapping variable names to objects.
Deletion is performed by removing keys from the namespace dictionary.
Modifying
locals()inside a function is not guaranteed to free memory. For reliable cleanup inside functions, store DataFrames in a dict and pass that dict asnamespace.Process RSS memory may not decrease immediately even after garbage collection.
Usage Examples
The following examples demonstrate common and advanced usage patterns for
del_inactive_dataframes. Each example recreates its own DataFrames so behavior
is isolated and easy to follow.
Because del_inactive_dataframes inspects a namespace dictionary, these examples
explicitly pass namespace=globals() so the function can see variables defined
in this script or notebook.
Example 1: List Active DataFrames (No Deletion)
Inspect which DataFrames are currently active without deleting anything.
from eda_toolkit import del_inactive_dataframes

df_main = pd.DataFrame({"a": range(10)})
df_tmp = pd.DataFrame({"b": range(100)})

del_inactive_dataframes(
    dfs_to_keep = ["df"],
    del_dataframes=False,
    namespace=globals(),
)
Output
──────────────────────────────────────── Active DataFrames ────────────────────────────────────────
Current Active
    DataFrames
┏━━━━━━━━━━━━━━━━┓
┃ DataFrame Name ┃
┡━━━━━━━━━━━━━━━━┩
│ _              │
│ __             │
│ ___            │
│ df             │
│ df_copy        │
│ df_main        │
│ df_tmp         │
│ sampled_df     │
└────────────────┘
{'active': ['_',
'__',
'___',
'df',
'df_copy',
'df_main',
'df_tmp',
'sampled_df'],
'to_delete': [],
'deleted': [],
'remaining': [],
'used_rich': True,
'memory': None}
Example 2: Delete Everything Except a Single DataFrame
Remove all DataFrames except the one explicitly listed.
from eda_toolkit import del_inactive_dataframes

df_main = pd.DataFrame({"a": range(10)})
df_tmp = pd.DataFrame({"b": range(100)})

del_inactive_dataframes(
    dfs_to_keep = ["df"],
    del_dataframes=True,
    namespace=globals(),
)
Output
──────────────────────────────────────── Active DataFrames ────────────────────────────────────────
Current Active
    DataFrames
┏━━━━━━━━━━━━━━━━┓
┃ DataFrame Name ┃
┡━━━━━━━━━━━━━━━━┩
│ X              │
│ X_fixed        │
│ X_global       │
│ data           │
│ df             │
│ df_impute      │
│ df_main        │
│ df_strip       │
│ df_table1_cat  │
│ df_tmp         │
│ filtered_df    │
│ y              │
└────────────────┘
──────────────────────────────────────── Planned Deletions ────────────────────────────────────────
DataFrames Marked
for Deletion
┏━━━━━━━━━━━━━━━━┓
┃ DataFrame Name ┃
┡━━━━━━━━━━━━━━━━┩
│ X              │
│ X_fixed        │
│ X_global       │
│ data           │
│ df_impute      │
│ df_main        │
│ df_strip       │
│ df_table1_cat  │
│ df_tmp         │
│ filtered_df    │
│ y              │
└────────────────┘
──────────────────────────────────────── Deleted DataFrames ────────────────────────────────────────
Deleted DataFrames
┏━━━━━━━━━━━━━━━━┓
┃ DataFrame Name ┃
┡━━━━━━━━━━━━━━━━┩
│ X              │
│ X_fixed        │
│ X_global       │
│ data           │
│ df_impute      │
│ df_main        │
│ df_strip       │
│ df_table1_cat  │
│ df_tmp         │
│ filtered_df    │
│ y              │
└────────────────┘
─────────────────────────────────────── Remaining DataFrames ───────────────────────────────────────
Remaining Active
    DataFrames
┏━━━━━━━━━━━━━━━━┓
┃ DataFrame Name ┃
┡━━━━━━━━━━━━━━━━┩
│ df             │
└────────────────┘
{'active': ['X',
'X_fixed',
'X_global',
'data',
'df',
'df_impute',
'df_main',
'df_strip',
'df_table1_cat',
'df_tmp',
'filtered_df',
'y'],
'to_delete': ['X',
'X_fixed',
'X_global',
'data',
'df_impute',
'df_main',
'df_strip',
'df_table1_cat',
'df_tmp',
'filtered_df',
'y'],
'deleted': ['X',
'X_fixed',
'X_global',
'data',
'df_impute',
'df_main',
'df_strip',
'df_table1_cat',
'df_tmp',
'filtered_df',
'y'],
'remaining': ['df'],
'used_rich': True,
'memory': None}
Example 3: Dry Run (Preview Deletions)
Preview which DataFrames would be deleted without actually removing them.
from eda_toolkit import del_inactive_dataframes

df_main = pd.DataFrame({"a": range(10)})
df_tmp = pd.DataFrame({"b": range(100)})

del_inactive_dataframes(
    dfs_to_keep = ["df"],
    del_dataframes=True,
    dry_run=True,
    namespace=globals(),
)
Output
──────────────────────────────────────── Active DataFrames ────────────────────────────────────────
Current Active
    DataFrames
┏━━━━━━━━━━━━━━━━┓
┃ DataFrame Name ┃
┡━━━━━━━━━━━━━━━━┩
│ __             │
│ ___            │
│ df             │
│ df_copy        │
│ df_main        │
│ df_tmp         │
│ sampled_df     │
└────────────────┘
──────────────────────────────────────── Planned Deletions ────────────────────────────────────────
DataFrames Marked
for Deletion
┏━━━━━━━━━━━━━━━━┓
┃ DataFrame Name ┃
┡━━━━━━━━━━━━━━━━┩
│ __             │
│ ___            │
│ df_copy        │
│ df_main        │
│ df_tmp         │
│ sampled_df     │
└────────────────┘
Dry run enabled. No DataFrames were deleted.
─────────────────────────────────────── Remaining DataFrames ───────────────────────────────────────
Remaining Active
    DataFrames
┏━━━━━━━━━━━━━━━━┓
┃ DataFrame Name ┃
┡━━━━━━━━━━━━━━━━┩
│ __             │
│ ___            │
│ df             │
│ df_copy        │
│ df_main        │
│ df_tmp         │
│ sampled_df     │
└────────────────┘
{'active': ['__', '___', 'df', 'df_copy', 'df_main', 'df_tmp', 'sampled_df'],
'to_delete': ['__', '___', 'df_copy', 'df_main', 'df_tmp', 'sampled_df'],
'deleted': [],
'remaining': ['__',
'___',
'df',
'df_copy',
'df_main',
'df_tmp',
'sampled_df'],
'used_rich': True,
'memory': None}
This mode is recommended before running destructive cleanup steps.
Example 4: Include IPython Output Cache Variables
In Jupyter notebooks, output cache variables such as _14 may reference large
DataFrames. These are ignored by default but can be included explicitly.
from eda_toolkit import del_inactive_dataframes

df_main = pd.DataFrame({"a": range(10)})
df_tmp = pd.DataFrame({"b": range(100)})

_ = df_tmp  # simulates an IPython output cache reference

del_inactive_dataframes(
    dfs_to_keep = ["df"],
    del_dataframes=True,
    include_ipython_cache=True,
    namespace=globals(),
)
Output
──────────────────────────────────────── Active DataFrames ────────────────────────────────────────
Current Active
    DataFrames
┏━━━━━━━━━━━━━━━━┓
┃ DataFrame Name ┃
┡━━━━━━━━━━━━━━━━┩
│ _              │
│ _10            │
│ _19            │
│ _8             │
│ df             │
│ df_main        │
│ df_tmp         │
└────────────────┘
──────────────────────────────────────── Planned Deletions ────────────────────────────────────────
DataFrames Marked
for Deletion
┏━━━━━━━━━━━━━━━━┓
┃ DataFrame Name ┃
┡━━━━━━━━━━━━━━━━┩
│ _              │
│ _10            │
│ _19            │
│ _8             │
│ df_main        │
│ df_tmp         │
└────────────────┘
──────────────────────────────────────── Deleted DataFrames ────────────────────────────────────────
Deleted DataFrames
┏━━━━━━━━━━━━━━━━┓
┃ DataFrame Name ┃
┡━━━━━━━━━━━━━━━━┩
│ _              │
│ _10            │
│ _19            │
│ _8             │
│ df_main        │
│ df_tmp         │
└────────────────┘
─────────────────────────────────────── Remaining DataFrames ───────────────────────────────────────
Remaining Active
    DataFrames
┏━━━━━━━━━━━━━━━━┓
┃ DataFrame Name ┃
┡━━━━━━━━━━━━━━━━┩
│ df             │
└────────────────┘
{'active': ['_', '_10', '_19', '_8', 'df', 'df_main', 'df_tmp'],
'to_delete': ['_', '_10', '_19', '_8', 'df_main', 'df_tmp'],
'deleted': ['_', '_10', '_19', '_8', 'df_main', 'df_tmp'],
'remaining': ['df'],
'used_rich': True,
'memory': None}
Example 5: Track DataFrame Memory Usage
Report total DataFrame memory usage before and after cleanup.
from eda_toolkit import del_inactive_dataframes

df_main = pd.DataFrame({"a": range(10)})
df_tmp = pd.DataFrame({"b": range(100)})

del_inactive_dataframes(
    dfs_to_keep = ["df"],
    del_dataframes=True,
    track_memory=True,
    namespace=globals(),
)
Output
──────────────────────────────────────── Active DataFrames ────────────────────────────────────────
Current Active
    DataFrames
┏━━━━━━━━━━━━━━━━┓
┃ DataFrame Name ┃
┡━━━━━━━━━━━━━━━━┩
│ df             │
│ df_main        │
│ df_tmp         │
└────────────────┘
──────────────────────────────────────── Planned Deletions ────────────────────────────────────────
DataFrames Marked
for Deletion
┏━━━━━━━━━━━━━━━━┓
┃ DataFrame Name ┃
┡━━━━━━━━━━━━━━━━┩
│ df_main        │
│ df_tmp         │
└────────────────┘
──────────────────────────────────────── Deleted DataFrames ────────────────────────────────────────
Deleted DataFrames
┏━━━━━━━━━━━━━━━━┓
┃ DataFrame Name ┃
┡━━━━━━━━━━━━━━━━┩
│ df_main        │
│ df_tmp         │
└────────────────┘
─────────────────────────────────────── Remaining DataFrames ───────────────────────────────────────
Remaining Active
    DataFrames
┏━━━━━━━━━━━━━━━━┓
┃ DataFrame Name ┃
┡━━━━━━━━━━━━━━━━┩
│ df             │
└────────────────┘
────────────────────────────────────────────── Memory ──────────────────────────────────────────────
            Memory Usage (MB)
┏━━━━━━━━━━━━━━━━━━┳━━━━━━━━┳━━━━━━━┳━━━━━━━┓
┃ Metric           ┃ Before ┃ After ┃ Delta ┃
┡━━━━━━━━━━━━━━━━━━╇━━━━━━━━╇━━━━━━━╇━━━━━━━┩
│ DataFrames total │   30.2 │  30.2 │  -0.0 │
└──────────────────┴────────┴───────┴───────┘
{'active': ['df', 'df_main', 'df_tmp'],
'to_delete': ['df_main', 'df_tmp'],
'deleted': ['df_main', 'df_tmp'],
'remaining': ['df'],
'used_rich': True,
'memory': {'dataframes_mb': {'before': 30.237445831298828,
'after': 30.23635482788086,
'delta': -0.00109100341796875},
'mode': 'dataframes'}}

This mode uses ``pandas.DataFrame.memory_usage(deep=True)`` for reporting.
Example 6: Track DataFrame Memory and Process RSS
Enable power-user memory tracking, including process-level RSS when available.
df_main = pd.DataFrame({"a": range(10)})
df_tmp = pd.DataFrame({"b": range(100)})

del_inactive_dataframes(
    dfs_to_keep = ["df"],
    del_dataframes=True,
    track_memory=True,
    memory_mode="all",
    namespace=globals(),
)
Output
──────────────────────────────────────── Active DataFrames ────────────────────────────────────────
Current Active
    DataFrames
┏━━━━━━━━━━━━━━━━┓
┃ DataFrame Name ┃
┡━━━━━━━━━━━━━━━━┩
│ df             │
│ df_main        │
│ df_tmp         │
└────────────────┘
──────────────────────────────────────── Planned Deletions ────────────────────────────────────────
DataFrames Marked
for Deletion
┏━━━━━━━━━━━━━━━━┓
┃ DataFrame Name ┃
┡━━━━━━━━━━━━━━━━┩
│ df_main        │
│ df_tmp         │
└────────────────┘
──────────────────────────────────────── Deleted DataFrames ────────────────────────────────────────
Deleted DataFrames
┏━━━━━━━━━━━━━━━━┓
┃ DataFrame Name ┃
┡━━━━━━━━━━━━━━━━┩
│ df_main        │
│ df_tmp         │
└────────────────┘
─────────────────────────────────────── Remaining DataFrames ───────────────────────────────────────
Remaining Active
    DataFrames
┏━━━━━━━━━━━━━━━━┓
┃ DataFrame Name ┃
┡━━━━━━━━━━━━━━━━┩
│ df             │
└────────────────┘
────────────────────────────────────────────── Memory ──────────────────────────────────────────────
            Memory Usage (MB)
┏━━━━━━━━━━━━━━━━━━┳━━━━━━━━┳━━━━━━━┳━━━━━━━┓
┃ Metric           ┃ Before ┃ After ┃ Delta ┃
┡━━━━━━━━━━━━━━━━━━╇━━━━━━━━╇━━━━━━━╇━━━━━━━┩
│ Process RSS      │  403.6 │ 403.6 │  +0.0 │
│ DataFrames total │   30.2 │  30.2 │  -0.0 │
└──────────────────┴────────┴───────┴───────┘
{'active': ['df', 'df_main', 'df_tmp'],
'to_delete': ['df_main', 'df_tmp'],
'deleted': ['df_main', 'df_tmp'],
'remaining': ['df'],
'used_rich': True,
'memory': {'dataframes_mb': {'before': 30.237445831298828,
'after': 30.23635482788086,
'delta': -0.00109100341796875},
'mode': 'all',
'process_mb': {'before': 403.5546875, 'after': 403.5546875, 'delta': 0.0}}}
Process RSS reporting requires psutil and may not immediately decrease
after garbage collection.
Example 7: Programmatic Usage (No Console Output)
Suppress console output and consume the returned summary dictionary directly.
from eda_toolkit import del_inactive_dataframes

df_main = pd.DataFrame({"a": range(10)})
df_tmp = pd.DataFrame({"b": range(100)})

summary = del_inactive_dataframes(
    ["df_main"],
    del_dataframes=True,
    verbose=False,
    track_memory=True,
    namespace=globals(),
)

print(summary)
Output
Returned summary dict:
{'active': ['df_main', 'df_tmp'], 'to_delete': ['df_tmp'], 'deleted': ['df_tmp'],
'remaining': ['df_main'], 'used_rich': False, 'memory': {'dataframes_mb':
{'before': 0.00109100341796875, 'after': 0.000202178955078125,
'delta': -0.000888824462890625}, 'mode': 'dataframes'}}
This pattern is useful in pipelines, automated scripts, and testing workflows.
When to Use This Utility
Long-lived Jupyter notebooks with many intermediate DataFrames
Cloud notebooks with limited RAM
ETL pipelines with staged intermediate results
Teaching environments where reproducibility and clarity matter
Any workflow where memory pressure needs to be controlled explicitly
This function is intentionally conservative, explicit, and observable, favoring safe cleanup over implicit or destructive behavior.